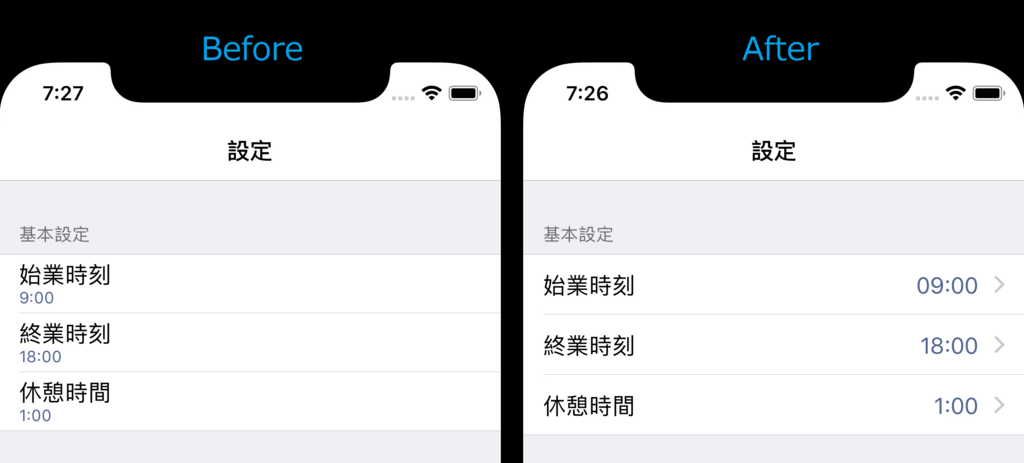
TextCellをカスタマイズしたい。
こんにちは、world_wide_anitoです。
TableViewなどで使用するTextCellをiPhoneの設定アプリっぽくカスタマイズしました。
当初、Cellに「>」をつけるのにも画像とか用意しないといけないのかなーとか思ってましたがそんなことはありませんでした。なお、本記事の内容はiOS向けの内容となっています。

TextCellのサブクラスを作成
TextCellを直接カスタマイズすることも可能ですが、組み込みのクラスを直接いじるのは気が引けるので今回はカスタマイズ用のサブクラスを作成することにします。といっても、TextCellを継承するだけで特に何を設定する必要もありません。
using Xamarin.Forms;

namespace TableViewSample
{
    public class MyTextCell: TextCell
    {
    }
}
カスタムレンダラーの作成
次にMyTextCellのカスタムレンダラーをiOSプロジェクトの中に作成します。TextCellのカスタムに使用するカスタムレンダラーは、TextCellRendererとなっています。
レンダラーの基本クラスおよびネイティブ コントロール - Xamarin | Microsoft Docs
using TableViewSample;
using TableViewSample.iOS;
using UIKit;
using Xamarin.Forms;
using Xamarin.Forms.Platform.iOS;

[assembly: ExportRenderer(typeof(MyTextCell), typeof(MyTextCellRenderer))]
namespace TableViewSample.iOS
{
    class MyTextCellRenderer : TextCellRenderer
    {
        public override UITableViewCell GetCell(Cell item, UITableViewCell reusableCell, UITableView tv)
        {
            return base.GetCell(item, reusableCell, tv);
        }
    }
}
ここまでは、Visual Studioのクイックアクションでほぼ全自動で作成することができます。
TextとDetailを横並びにする
TextとDetailを横並びのレイアウトにカスタマイズするには、カスタムレンダラーのGetCellメソッドに以下の様に書き換えます。
public override UITableViewCell GetCell(Cell item, UITableViewCell reusableCell, UITableView tv)
{
    var tvc = reusableCell as CellTableViewCell;
    if(tvc == null)
    {
        tvc = new CellTableViewCell(UITableViewCellStyle.Value1, item.GetType().FullName);
        tvc.Cell = item;
    }
    return base.GetCell(item, tvc, tv);
}
ここで一番重要なのは、UITableViewCellStyle.Value1の部分、ここがTextとDetailを横並びにするという指定になっています。なお、TextCellの既定値はUITableViewCellStyle.Subtitleです。UITableViewCellStyleの詳細については、以下の記事が大変参考になりました。
mikamiz|UITableViewとUITableViewCellのスタイル
アクセサリーをつける
次にTextCellの右側の「>」マークを付けます。DisclosureIndicatorと言うらしいです。
public override UITableViewCell GetCell(Cell item, UITableViewCell reusableCell, UITableView tv)
{
    var nativeCell =  base.GetCell(item, reusableCell, tv);
    nativeCell.Accessory = UITableViewCellAccessory.DisclosureIndicator;
    return nativeCell;
}
アクセサリーには、ほかにもチェックマークとかも設定できます。
設置する
TableViewのIntentプロパティにSettingsを設定すると、よりiPhoneの設定アプリっぽくなります。
<?xml version="1.0" encoding="utf-8" ?>
<ContentPage xmlns="http://xamarin.com/schemas/2014/forms"
             xmlns:x="http://schemas.microsoft.com/winfx/2009/xaml"
             xmlns:local="clr-namespace:TableViewSample"
             x:Class="TableViewSample.MainPage"
             Title="設定">

    <TableView Intent="Settings">
        <TableSection Title="基本設定">
            <local:MyTextCell Text="始業時刻" Detail="9:00" />
            <local:MyTextCell Text="終業時刻" Detail="18:00" />
            <local:MyTextCell Text="休憩時間" Detail="1:00" />
        </TableSection>
    </TableView>

</ContentPage>